Set up SSO (Pro)
SSO access is an enterprise feature only available in the professional or custom package.
This article explains how to set up single-sign-on with an SSO identity-provider and CodeShield. The process is straight forward and does not take more than 10-15 minutes.
Having an external identity provider for single-sing-on to CodeShield, employees can be assigned to the CodeShield app, and login with their usual company credentials. Having set up SSO also allows all users from the same identity provider to work together with CodeShield, by optionally sharing projects and scans with each other.
As we employ the SAML 2.0 (Security Assertion Markup Language 2.0) standard, its possible to use any SAML-based identity provider (like Azure AD or Salesforce) to set up single-sign-on with CodeShield. If you want to connect a different identity provider than AWS SSO or Azure AD, just let us know and we are happy to assist you!
AWS SSO
- Go to
AWS SSO.
- Click on
Applicationsin the left pane and then selectAdd applicationin theApplicationsconfiguration.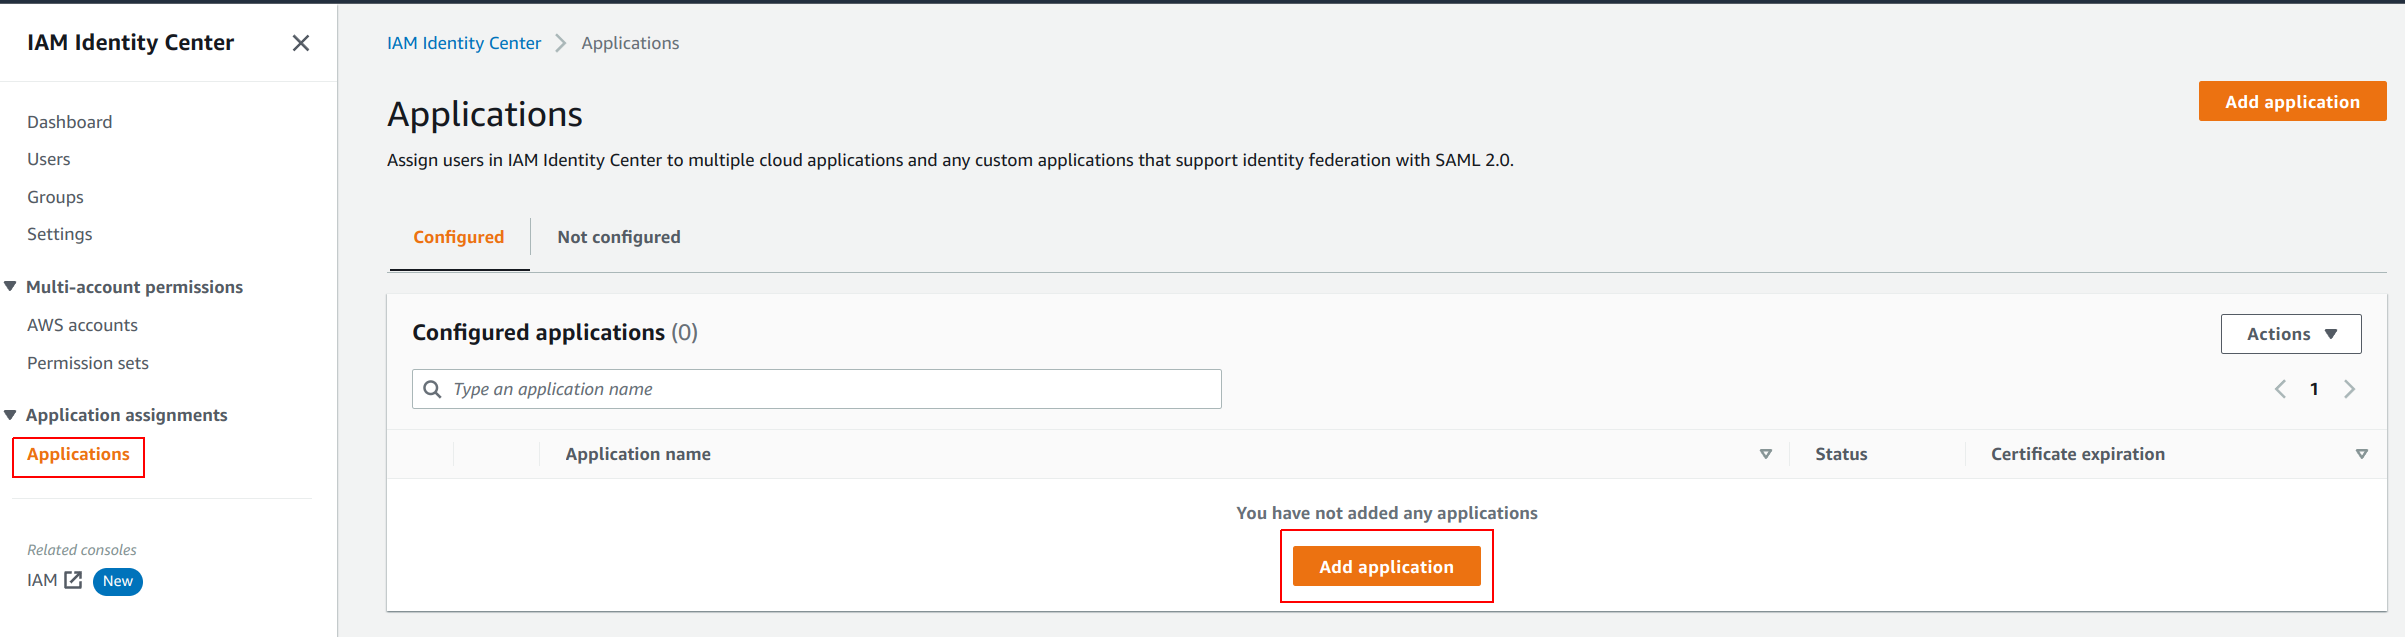
- Choose
Add custom SAML 2.0 application.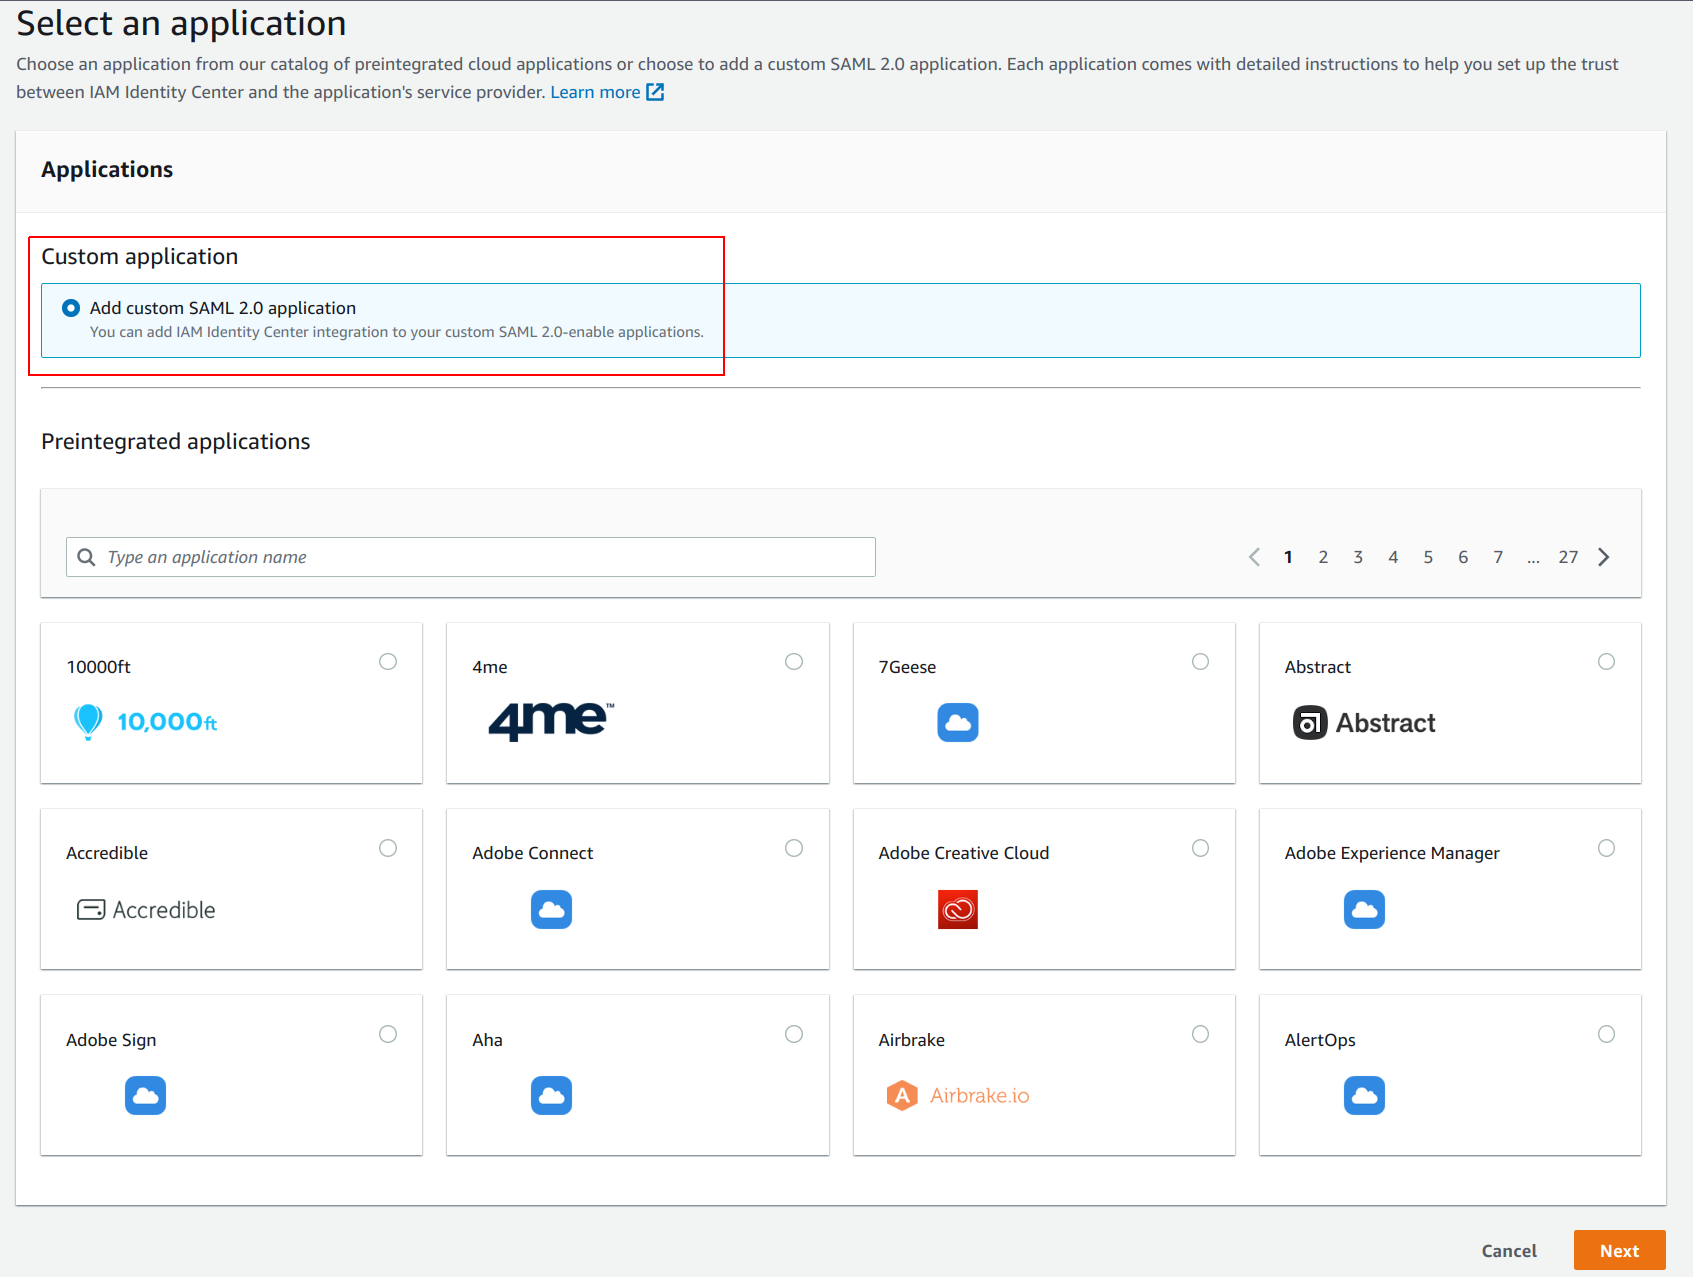
- Give the application a name (like
CodeShield). Leave the page open as you will need the URL to theIAM Identity Center SAML metadata filesoon.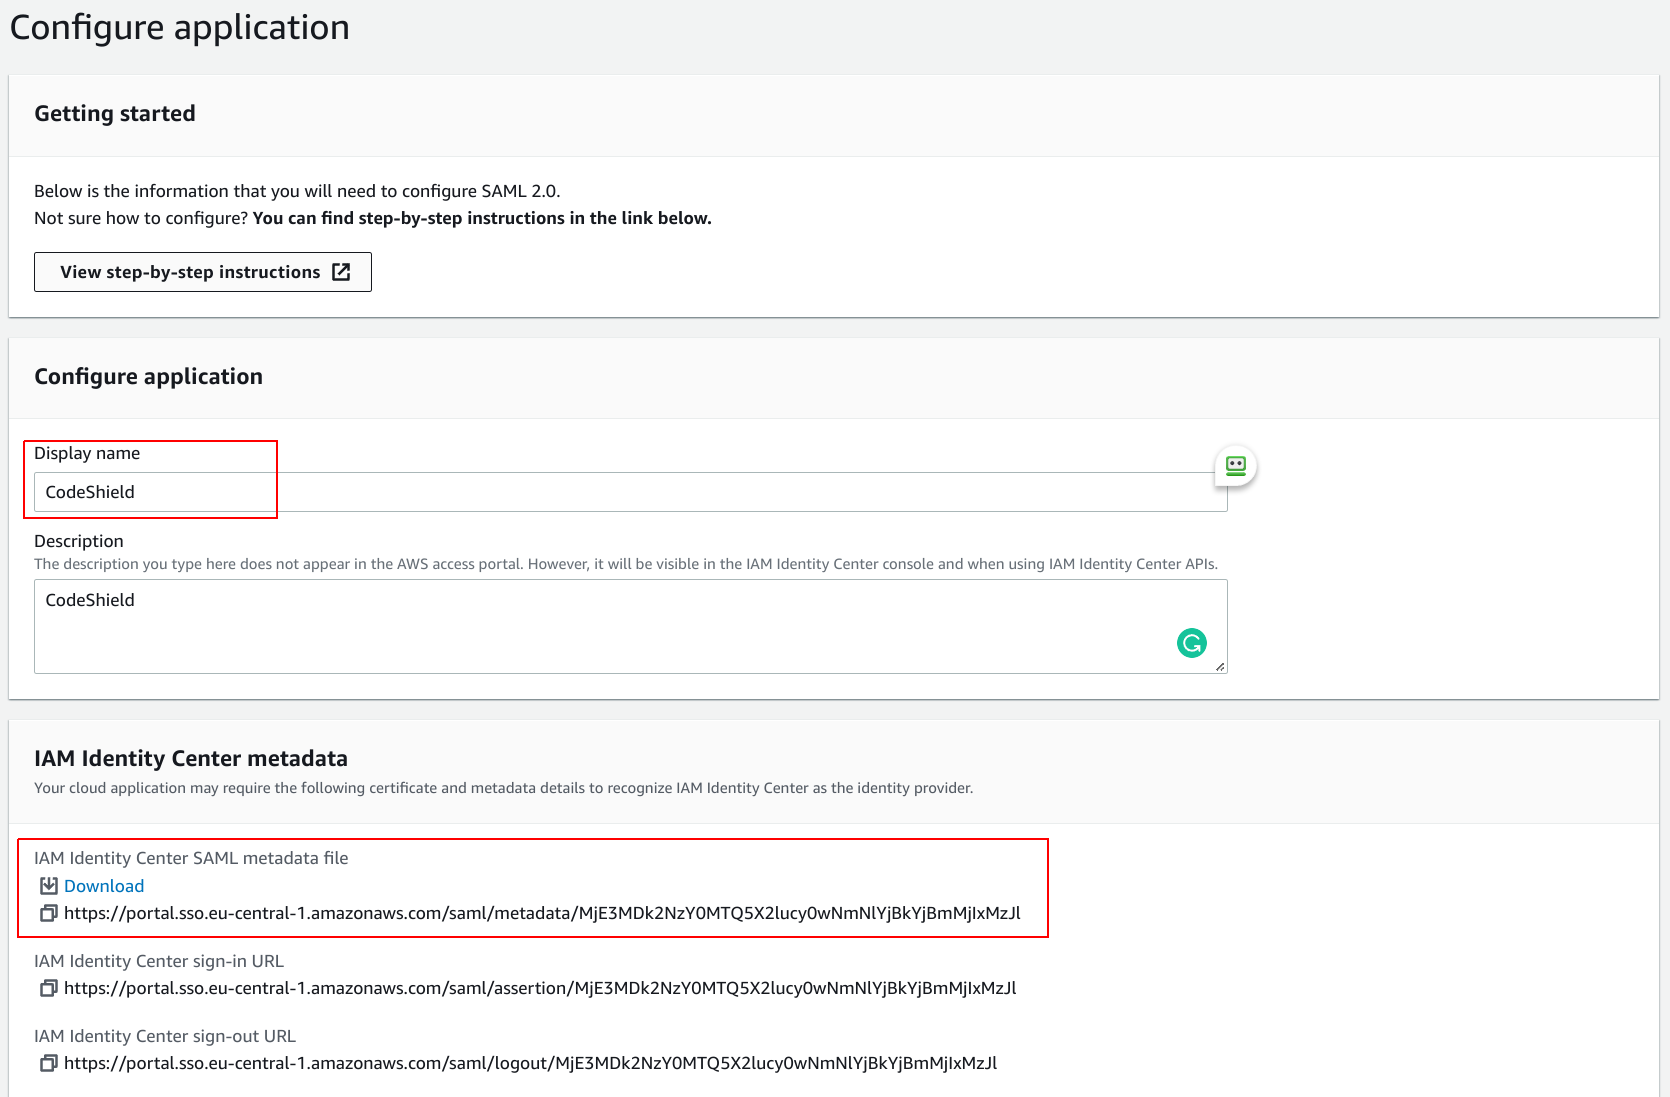
- Log into your CodeShield account (If you do not have a CodeShield account yet, create one first). This will be your management account. You will be able to disconnect the SAML identity provider and manage user access to all connected accounts from here later.
- Click on your user icon in the bottom-left corner and select
SSO settings.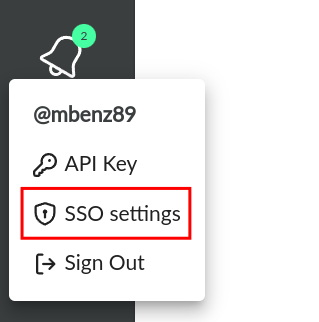
- Paste the
IAM Identity Center SAML metadata fileURL from 4. into the corresponding field. ClickConnect IDPto connect your identity provider.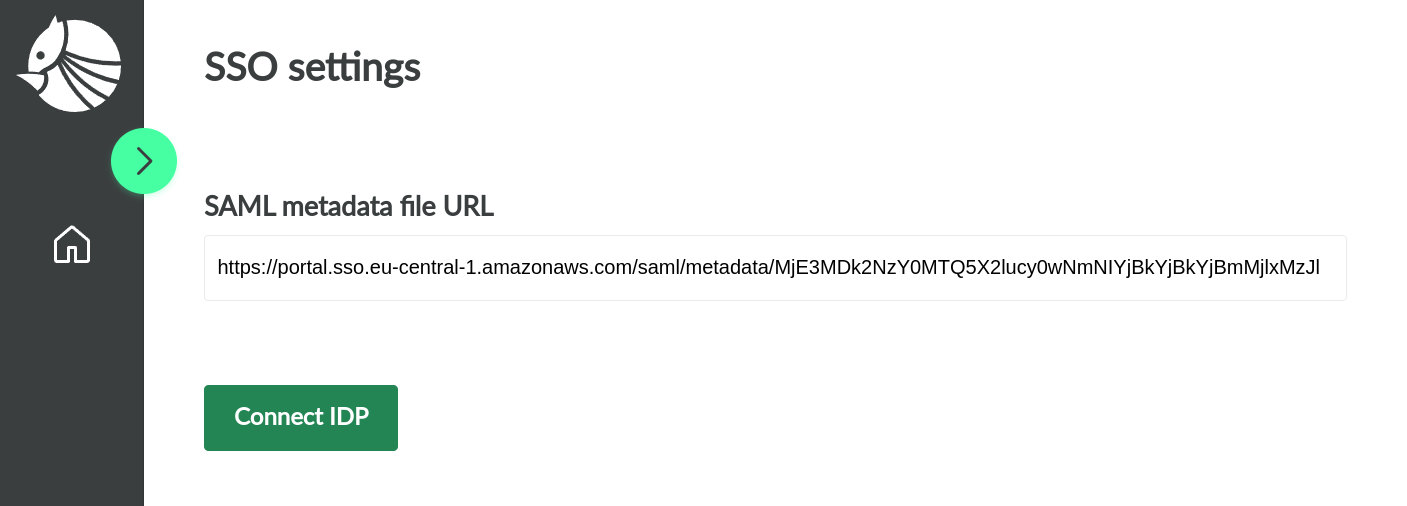
- After a few seconds, you will be proposed with the data to fill back into the AWS SSO application setup page from 4. Make sure to leave the current page open.
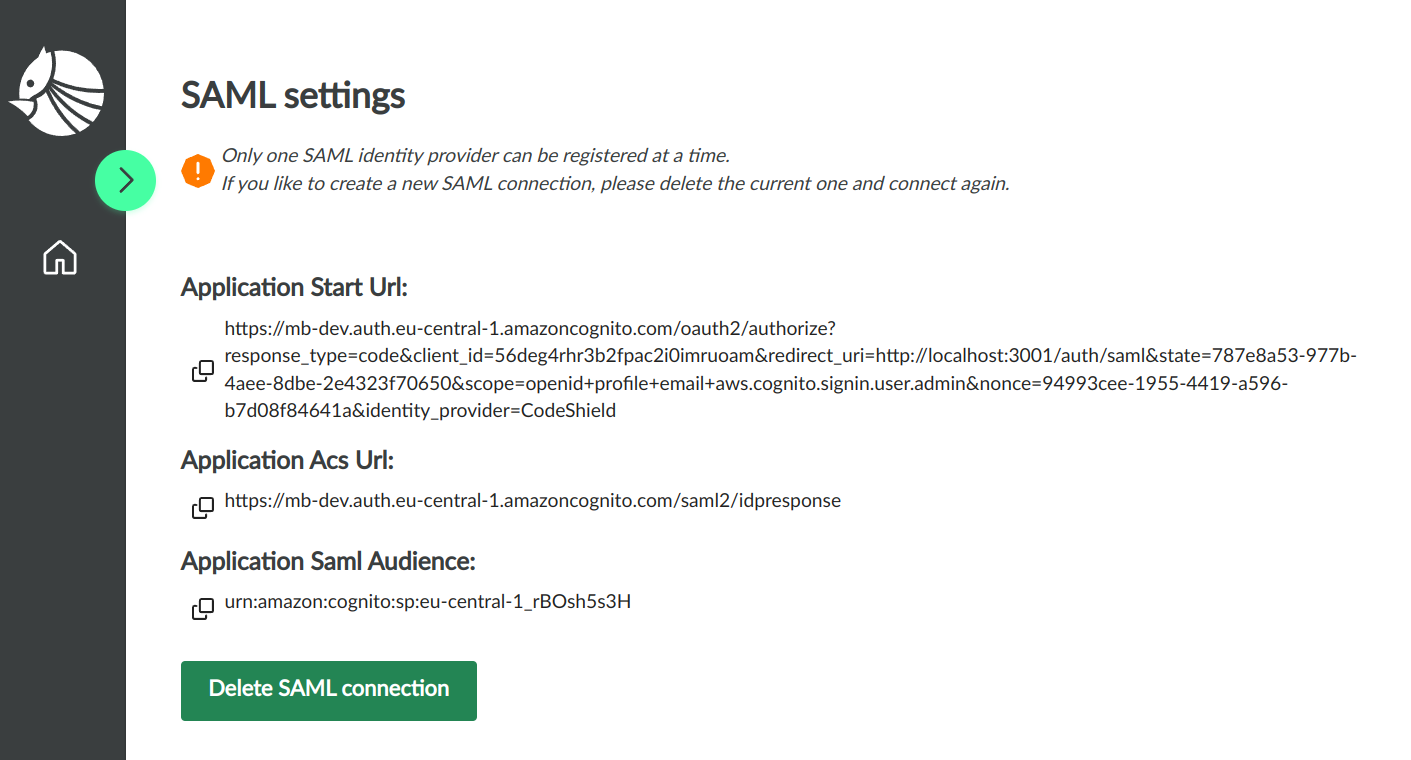
- Go back to the AWS SSO application set up page and fill in the
Application start URL,Application ACS URL, andApplication SAML audiencewith the values proposed by CodeShield in step 8.Submitthe form.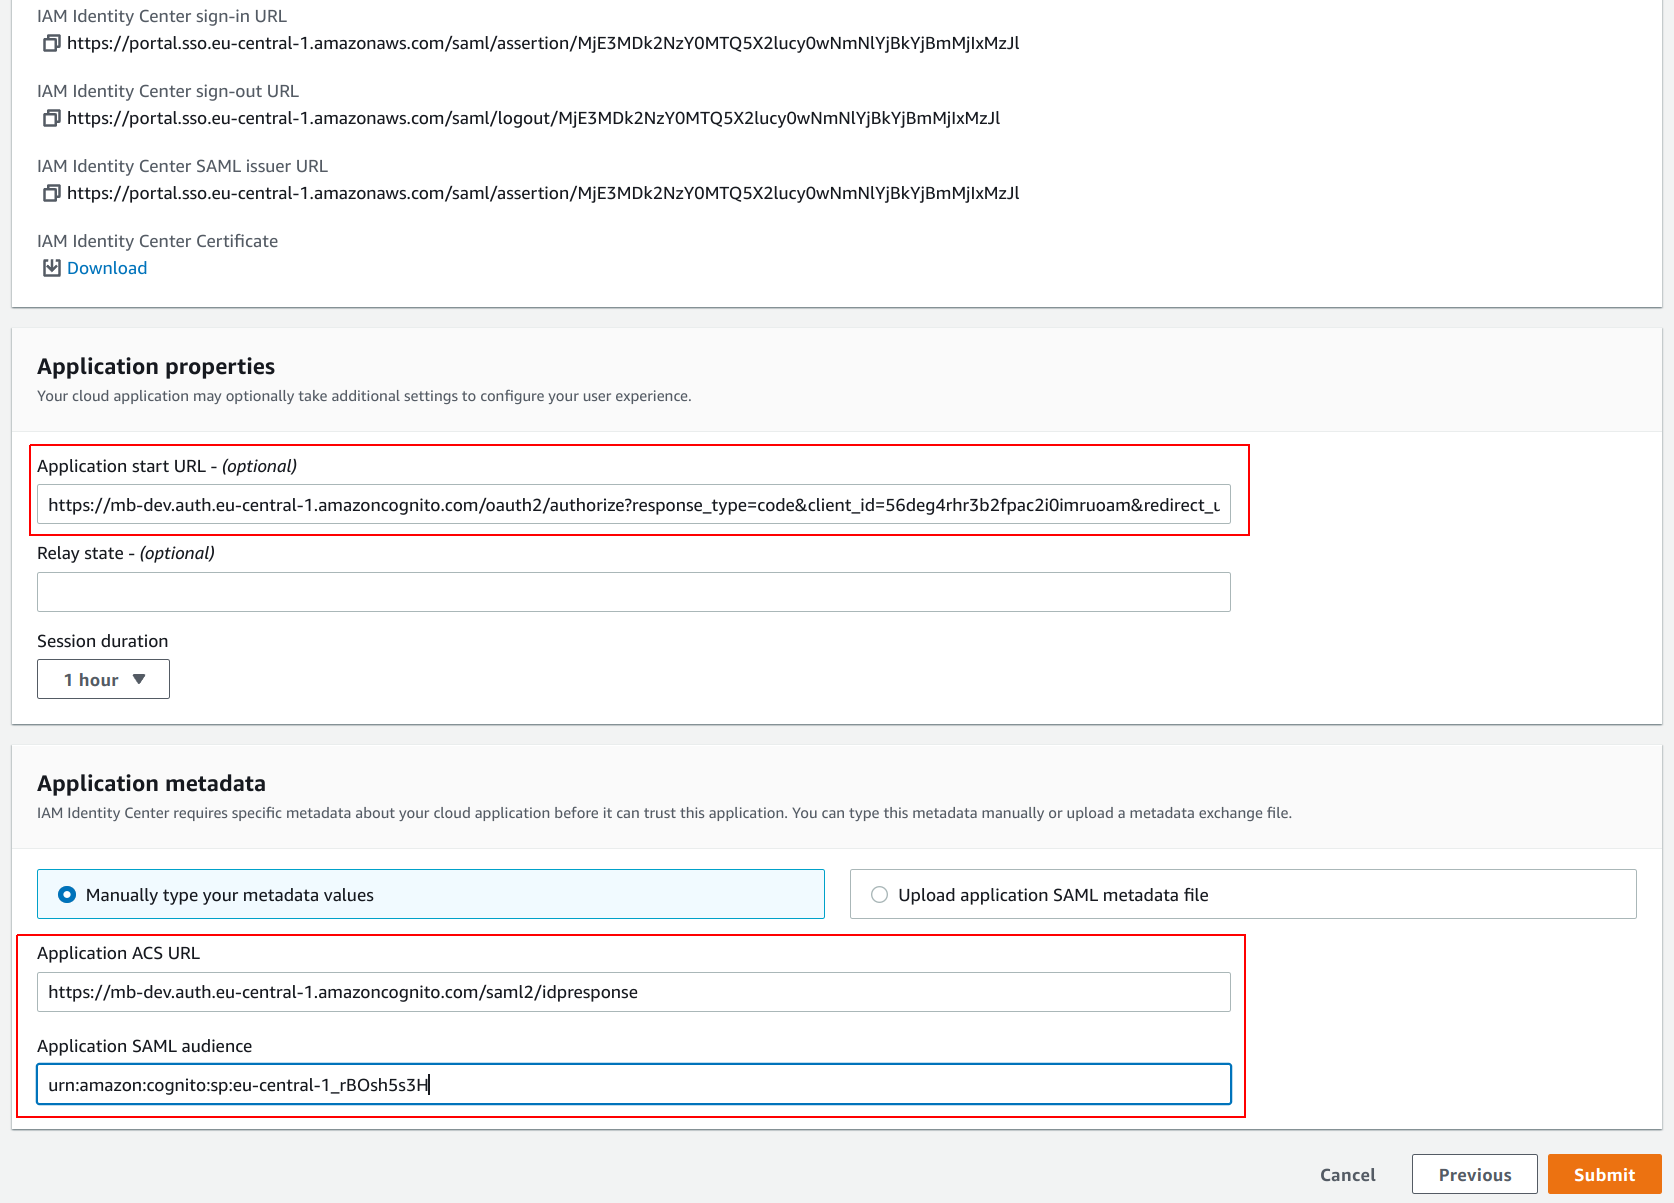
- Now that AWS SSO is connected with CodeShield, you can assign the users that should be able to access CodeShield with AWS SSO. In the
Applicationsettings, click onAssign Users.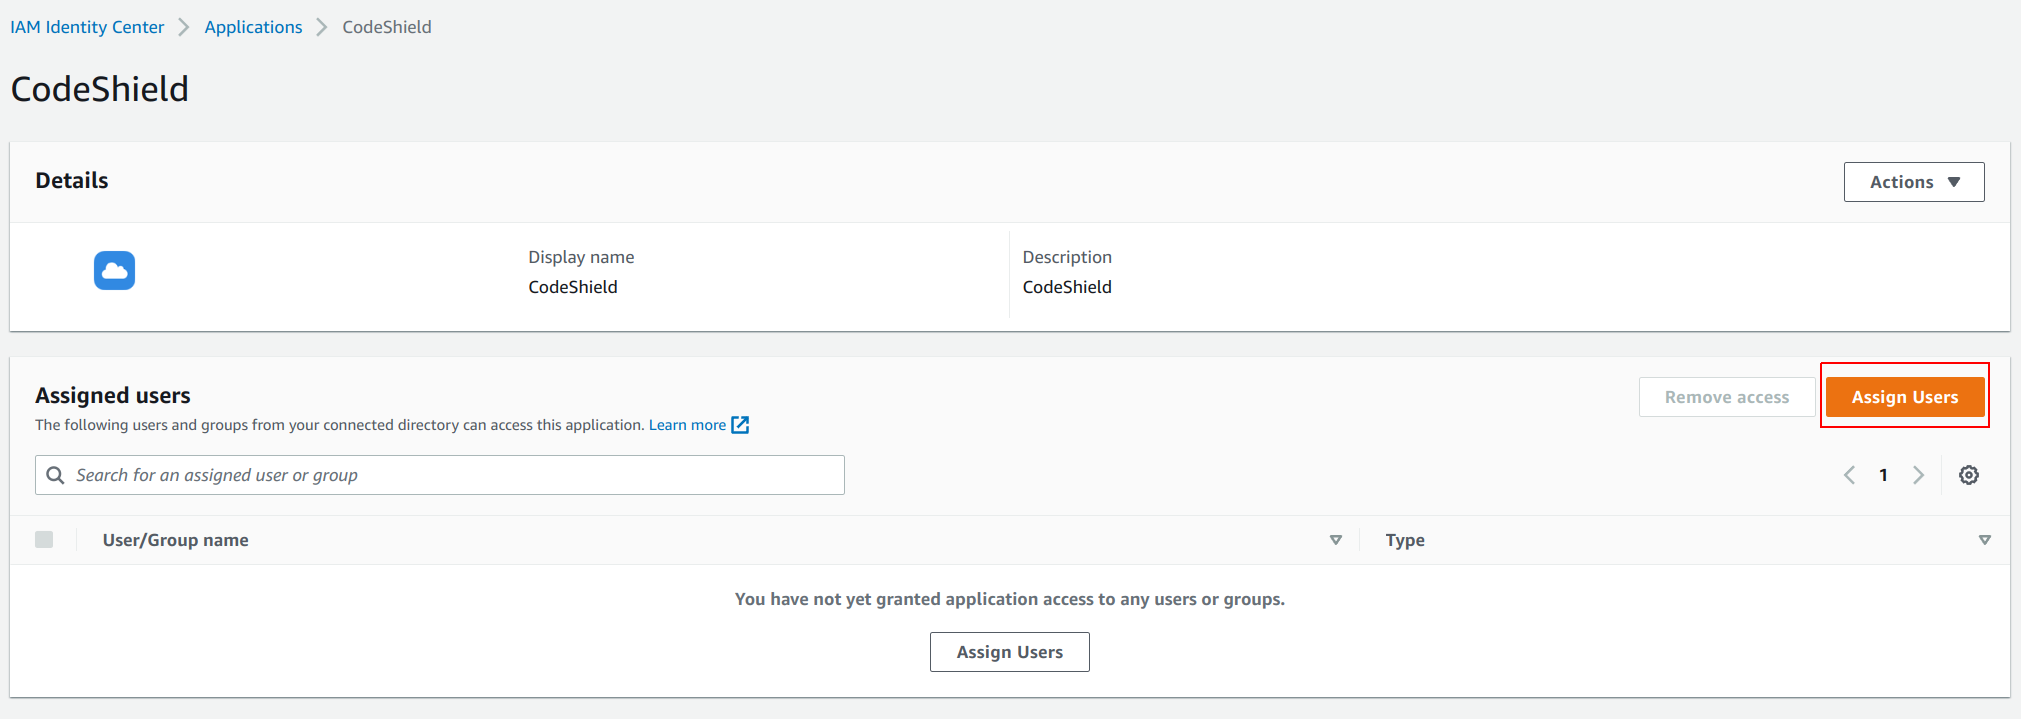
- Select the
UsersorGroupsthat should be able to access CodeShield and clickAssign Users.
- Lastly, you have to add
Attribute mappingsto the application. Click onActionsin the application settings, and then onEdit attribute mappings.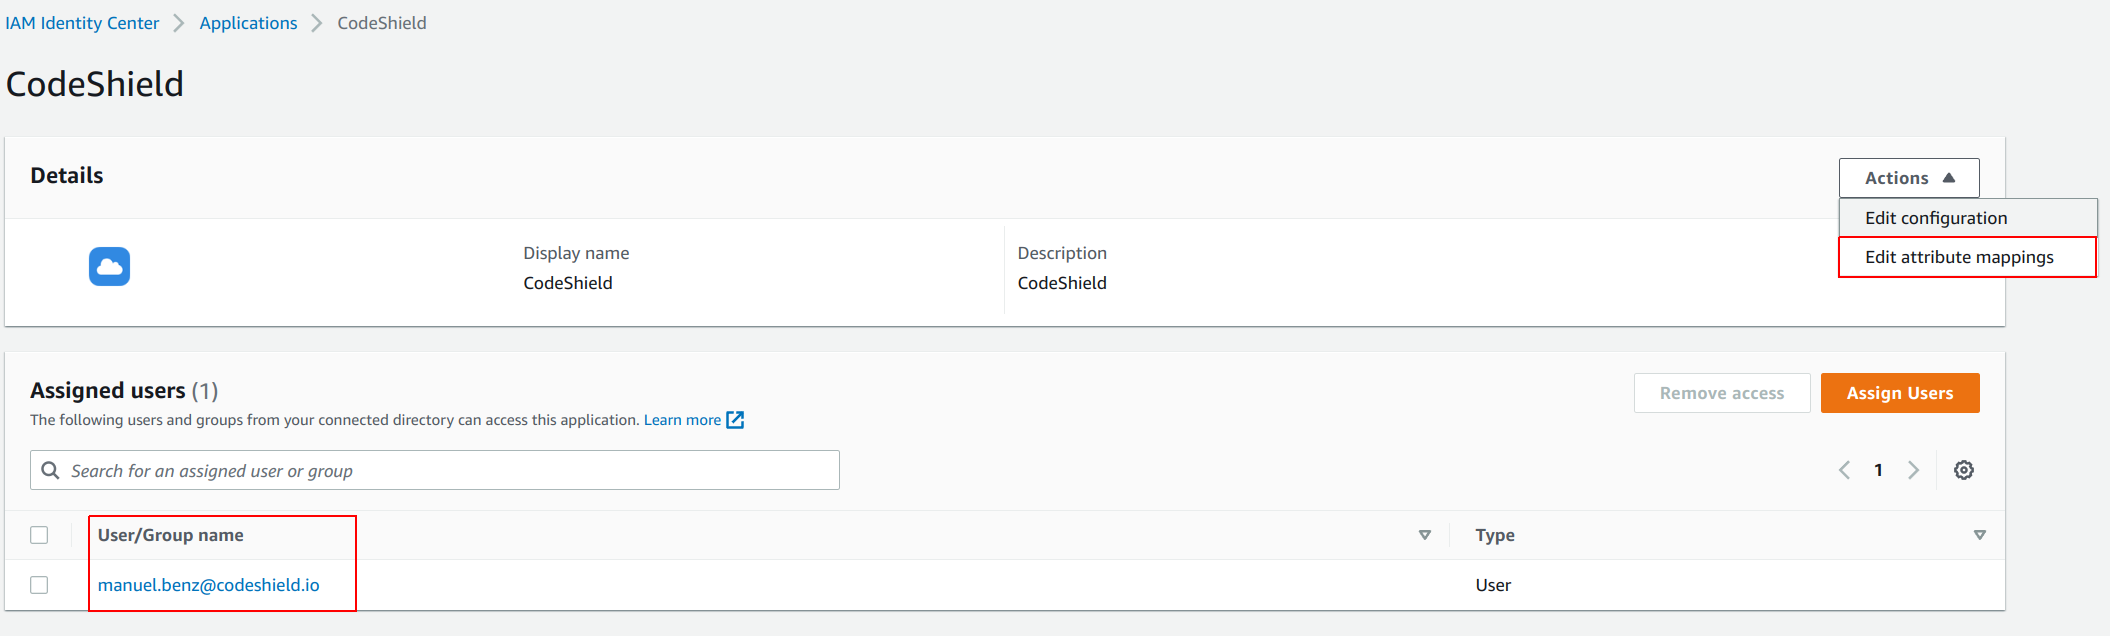
- Configure the mappings as shown in the image below. Use
${user:subject}as value for theSubjectand add another mapping foremailwith the value${user:email}. (This will communicate a subject ID and the user's email to CodeShield once the user signs in).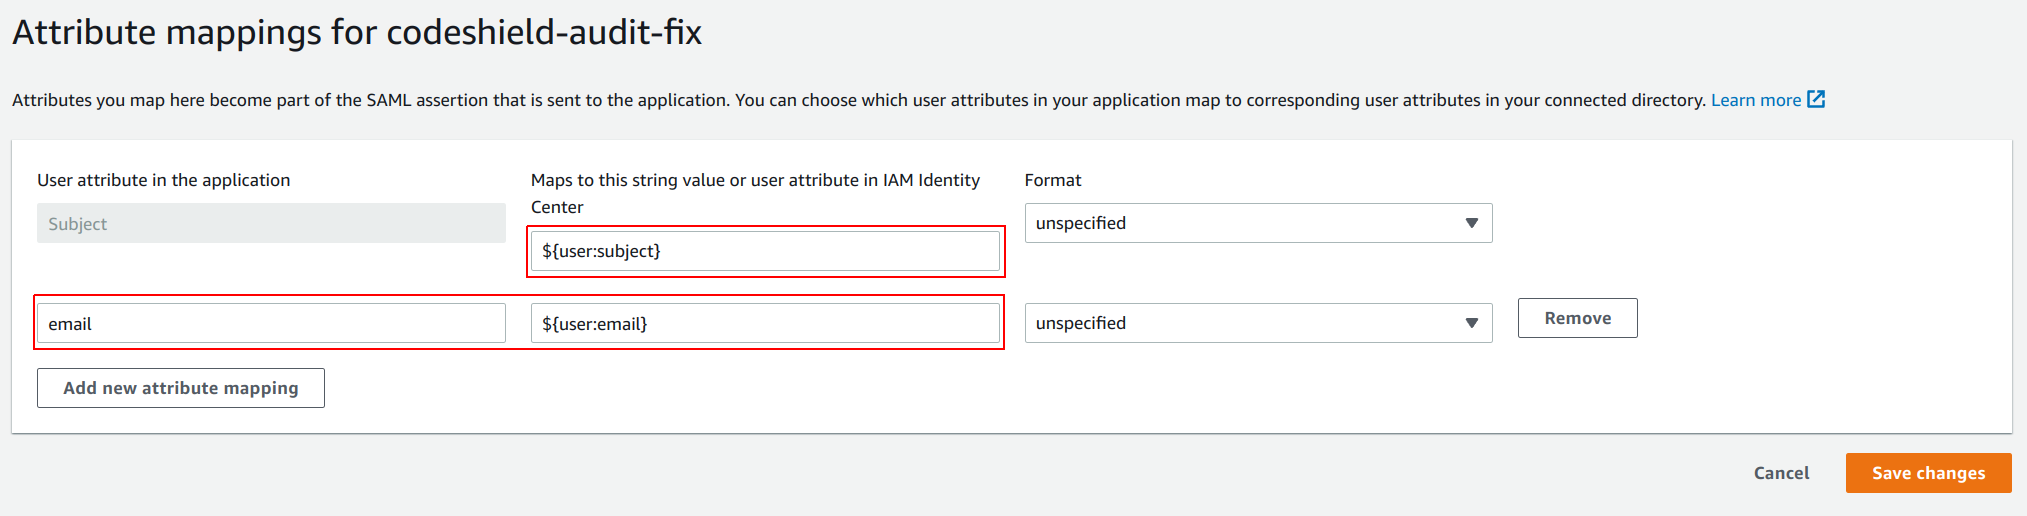
- The setup is complete. Every user assigned to the
CodeShieldapplication in AWS SSO will now be able to sign in to CodeShield over the usual AWS SSO access portal.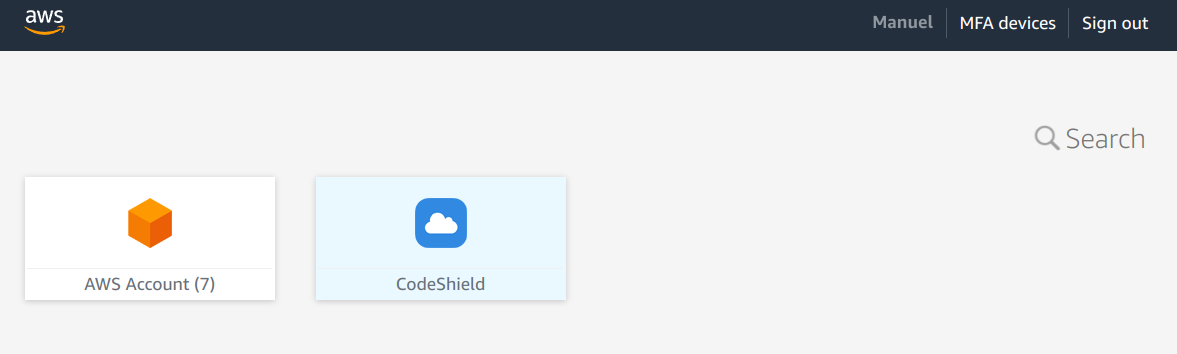
Note that users have to login once before they are registered at CodeShield. This is a restriction of AWS SSO, CodeShield has no way to see which users are assigned to it before AWS SSO communicates their user data at their first login.
Access management
Every user of the same identity provider can edit which other users should be able to access the user's owned account connections (and belonging scans) in the SSO settings page. The page can be reached as described in steps 5-6 of the previous section.
The admin user, who owns the management account, has full control over all users and their connected accounts, and can thus even edit access rights for account connections he did not set up himself.
Azure AD
- Go to
Azure AD. - Click on
Applicationsin the left pane, selectEnterprise applicationsin the submenu, and then click onNew application.
- Choose
Create your own applicationand give the application a name (likeCodeShield). Submit the form by clicking onCreate.
- After creating a new application in Azure AD, click on
Single sign-onand chooseSAMLfrom the options. Azure will present you with a view similar to the following. Make sure to copy theApp Federation Metadata Urlfor later.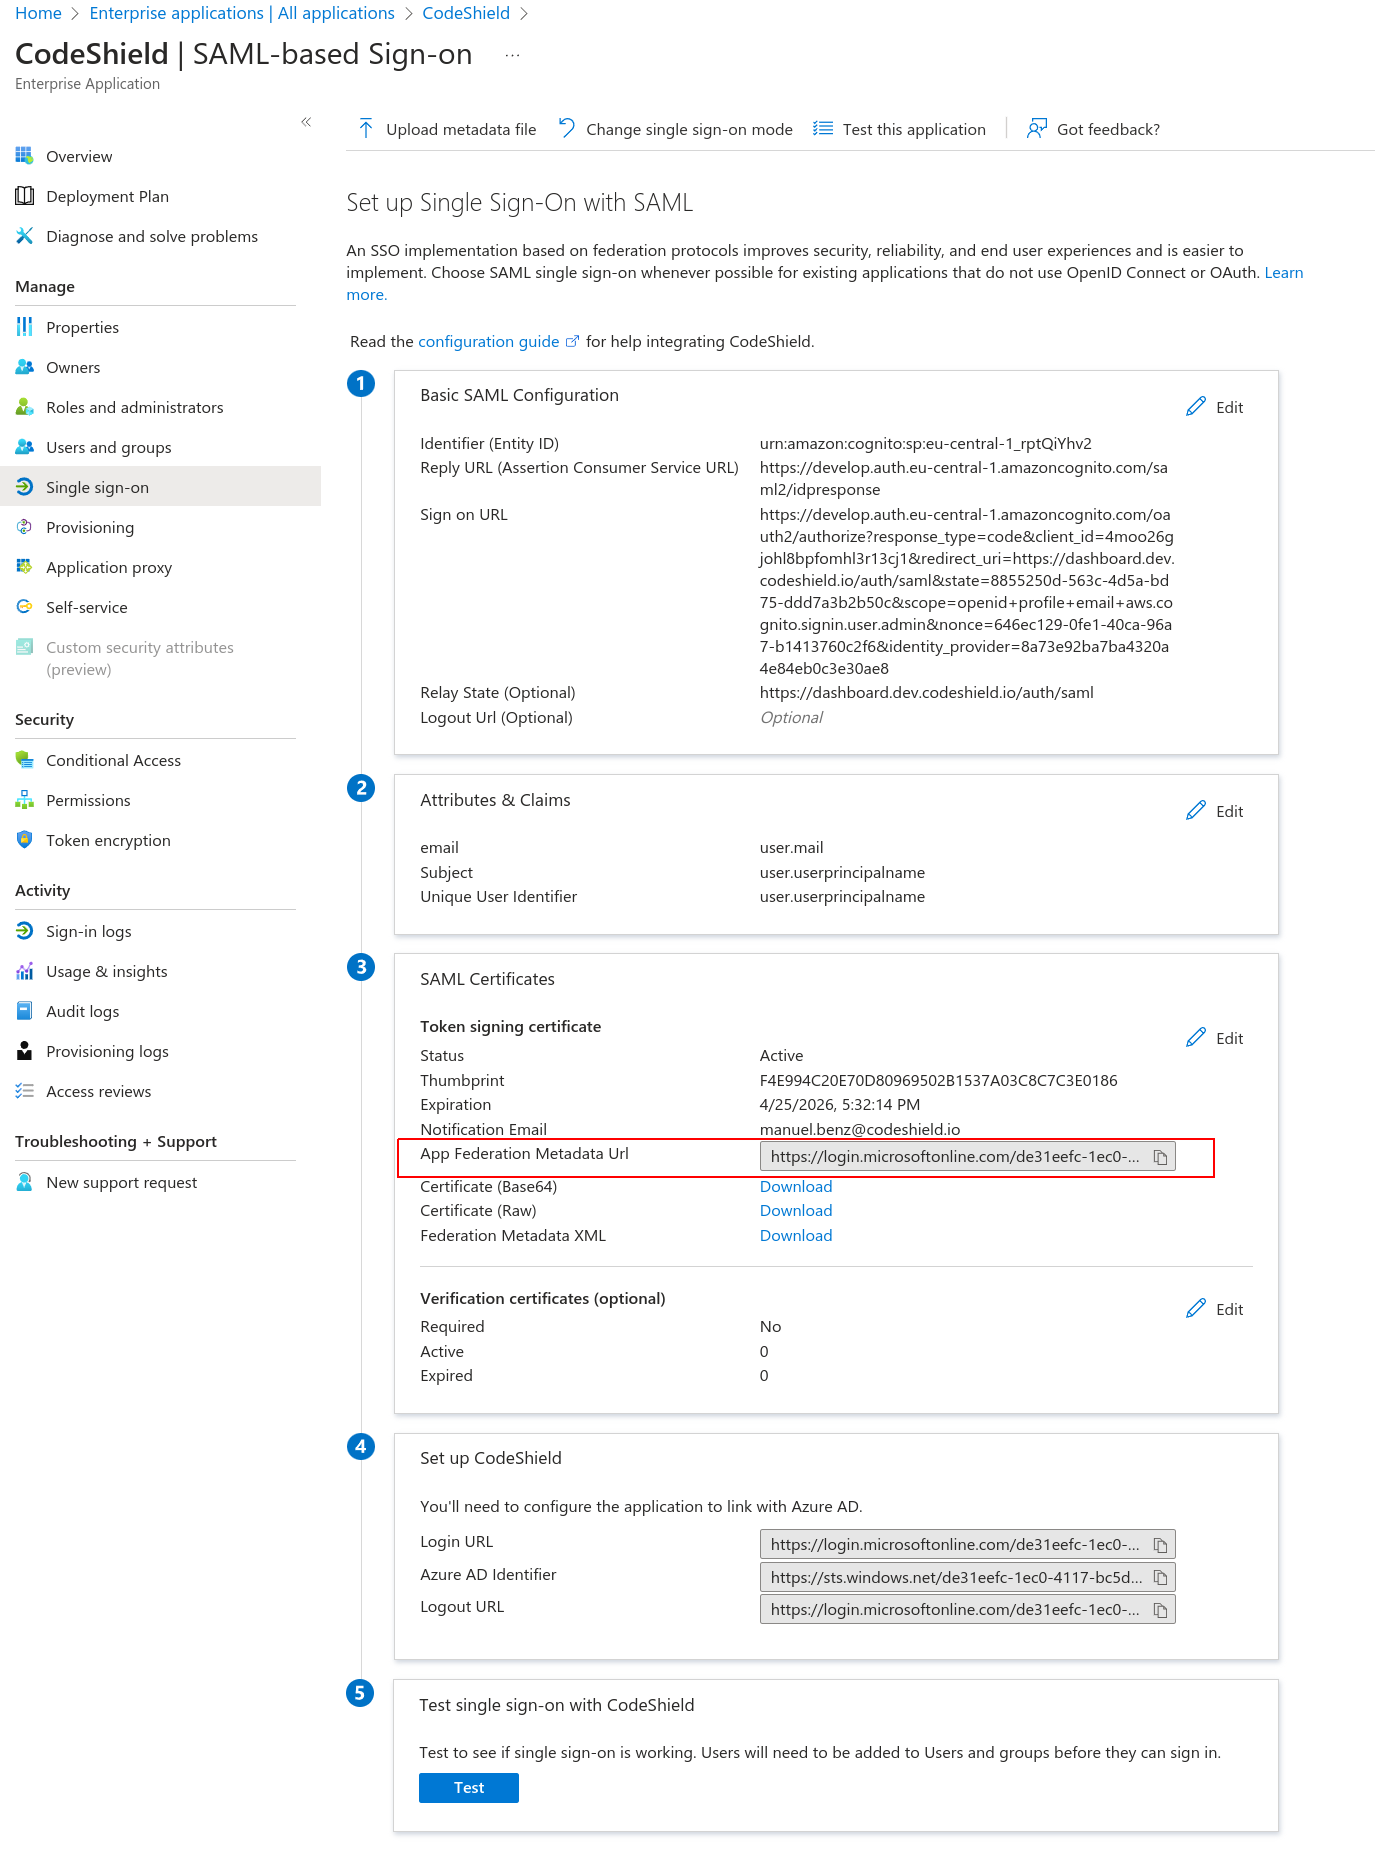
- Open a new tab and log into your CodeShield account (If you do not have a CodeShield account yet, create one first). This will be your management account. You will be able to disconnect the SAML identity provider and manage user access to all connected accounts from here later.
- Click on your user icon in the bottom-left corner and select
SSO settings. - Paste the
App Federation Metadata Urlfrom 4. into the corresponding field. ClickConnect IDPto connect your identity provider. - After a few seconds, you will be proposed with the data to fill back into the Azure
Single sign-onapplication setup page from 4. Make sure to leave the current page open. - Go back to the Azure
Single sign-onapplication set up page from step 4. and click onEditbesides theBasic SAML Configurationconfig.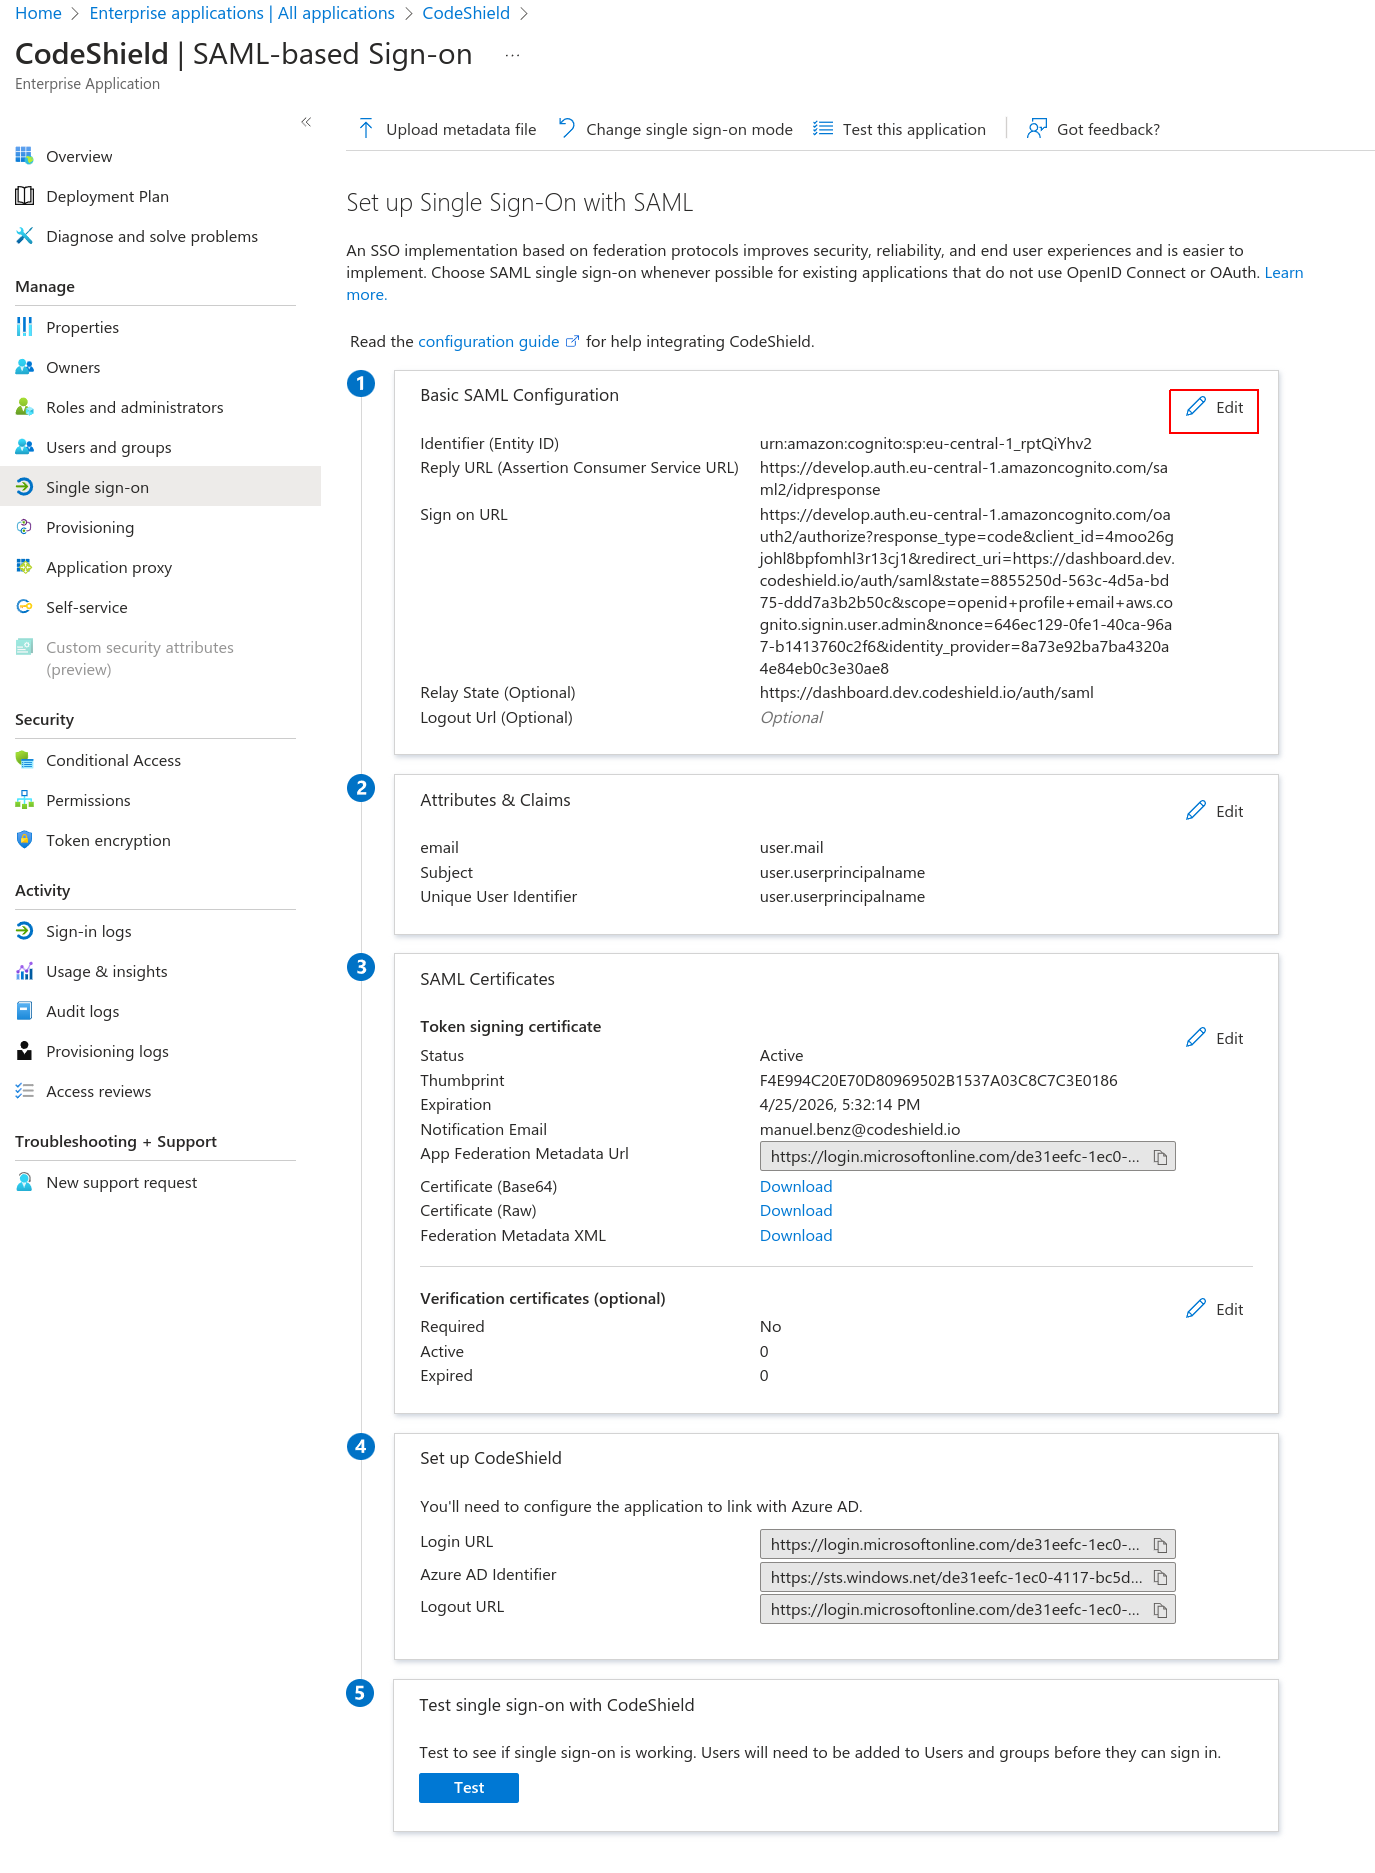
- Fill in the
Identifierfield with the value ofApplication SAML Audiencefrom CodeShield's dashboard (step 8.), theReply URLfield with CodeShield'sApplication ACS URL, theSign on URLwith CodeShield'sApplication start URL, and finally theRelay State URLwithhttps://dashboard.codeshield.io/auth/saml.Submitthe form.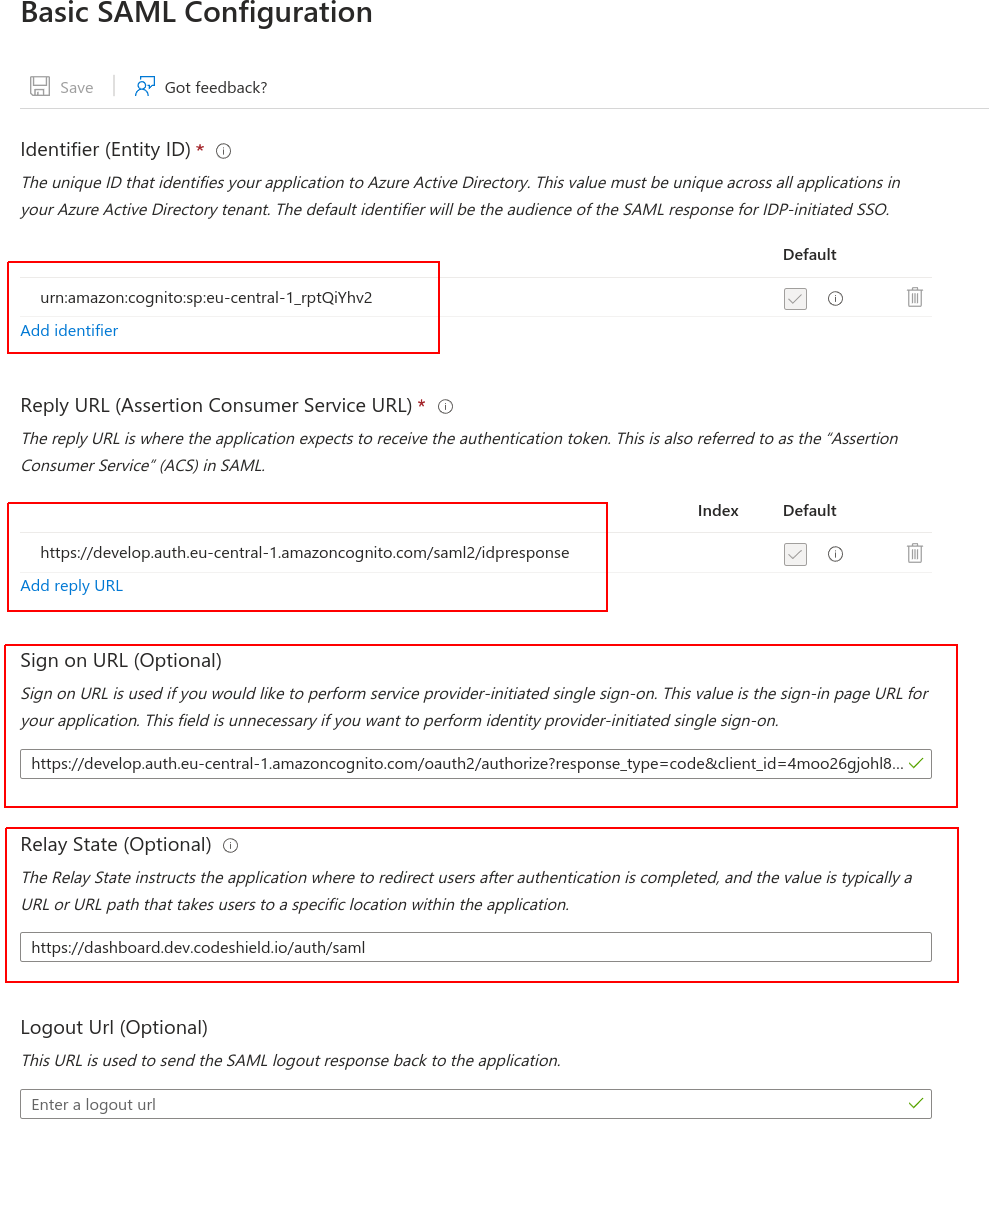
- Now that Azure SSO is connected with CodeShield, you can assign the users that should be able to access CodeShield with Azure SSO. In the
Applicationsettings, click onUsers and groups.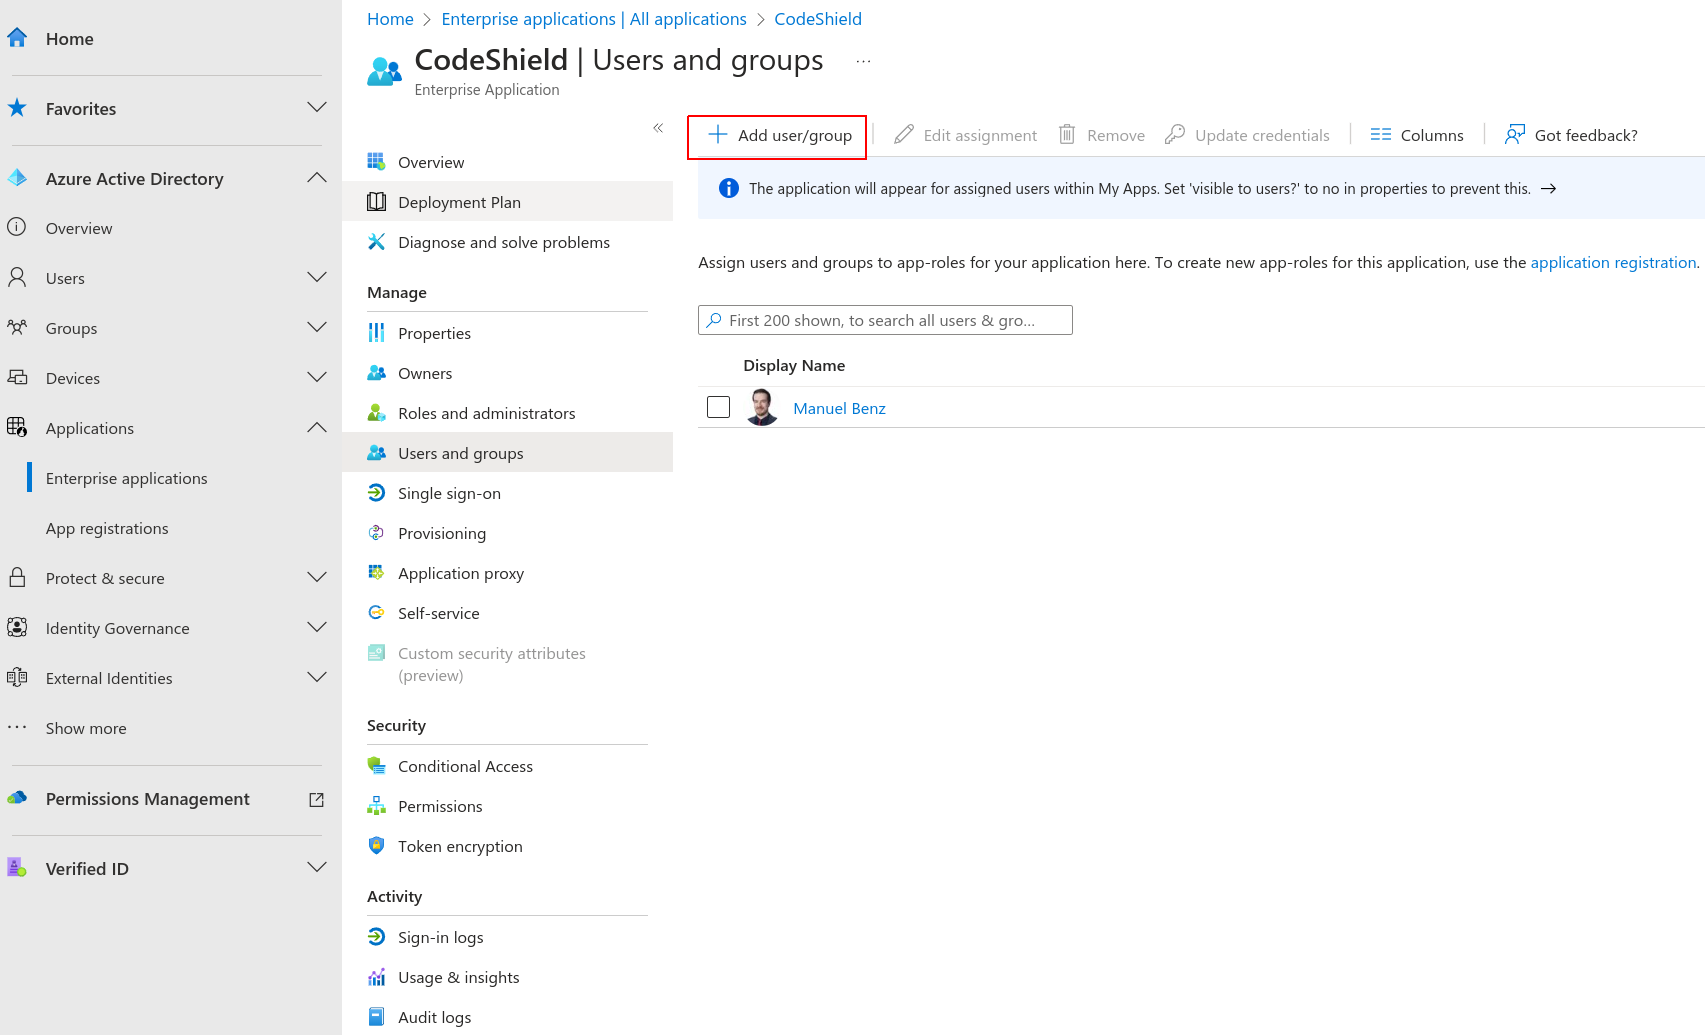
- Select the
UsersorGroupsthat should be able to access CodeShield. - Lastly, you have to add
Attributes & Claimsto the application. Click onSingle sign-onin the application settings, and then onEditbesides theAttributes & Claimssection. - Configure the mappings as shown in the image below. (This will communicate a subject ID and the user's email to CodeShield once the user signs in).
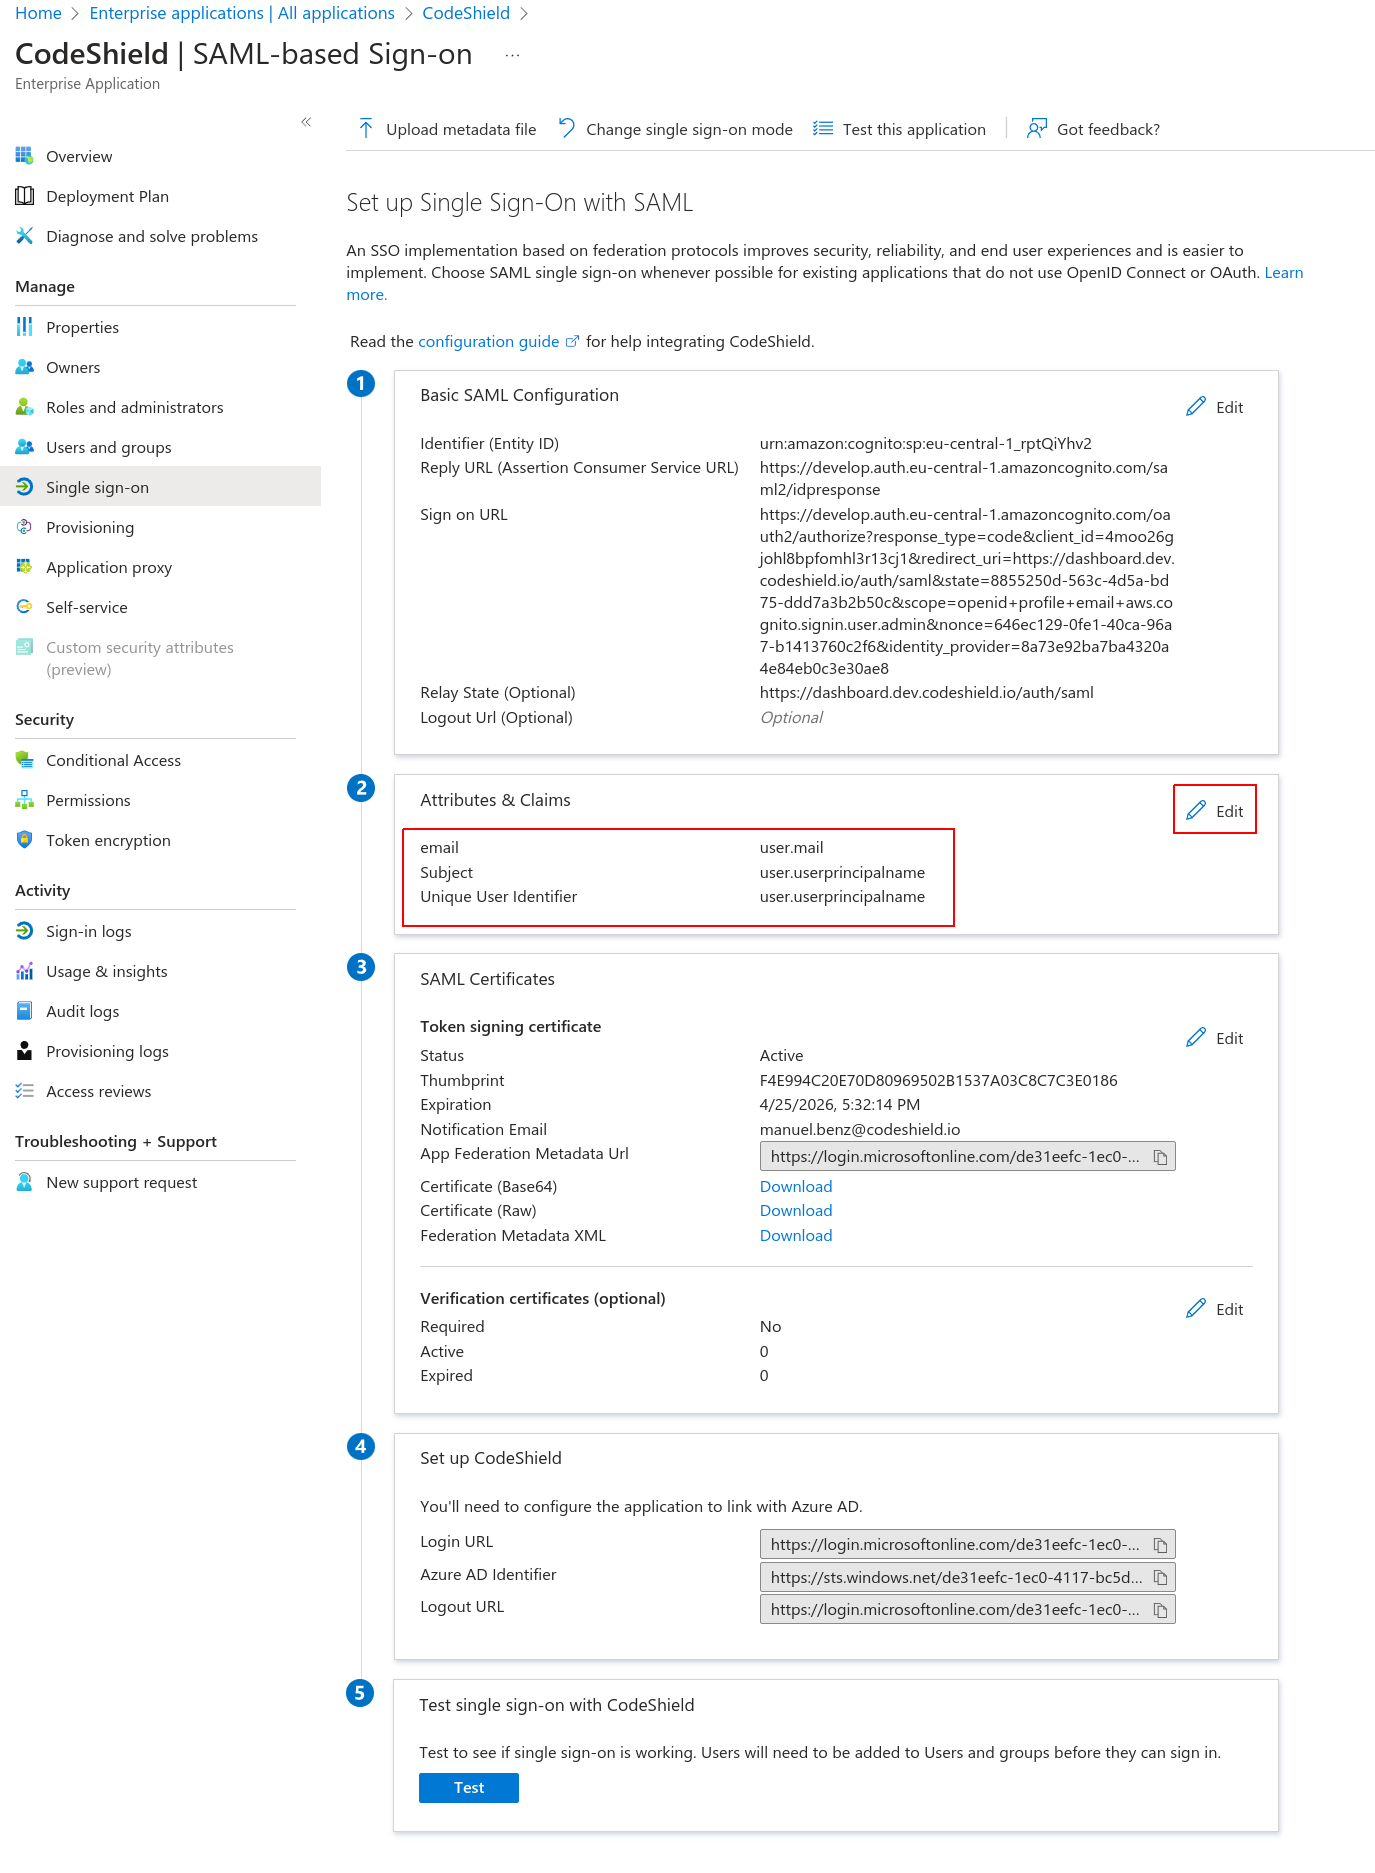
Sometimes user.mail is not configured to hold the email address of the Azure user entity. In such cases you will run into errors stating a missing email address, when trying to sign-in with such users. Make sure that you map the mail attribute to any attribute of your users that holds their email address.
Usually user.userprincipalname (UPN) also holds the user's email address, as this is the main identifier for login. However, we cannot guarantee this and suggest to contact your IT admin to identify a proper user attribute that contains the user's email.
- The setup is complete. You can test it for already assigned users by using the
Testbutton seen in step 14. Every user assigned to theCodeShieldapplication in the AzureSingle sign-onapplication will now be able to sign in to CodeShield over the url provided by azure: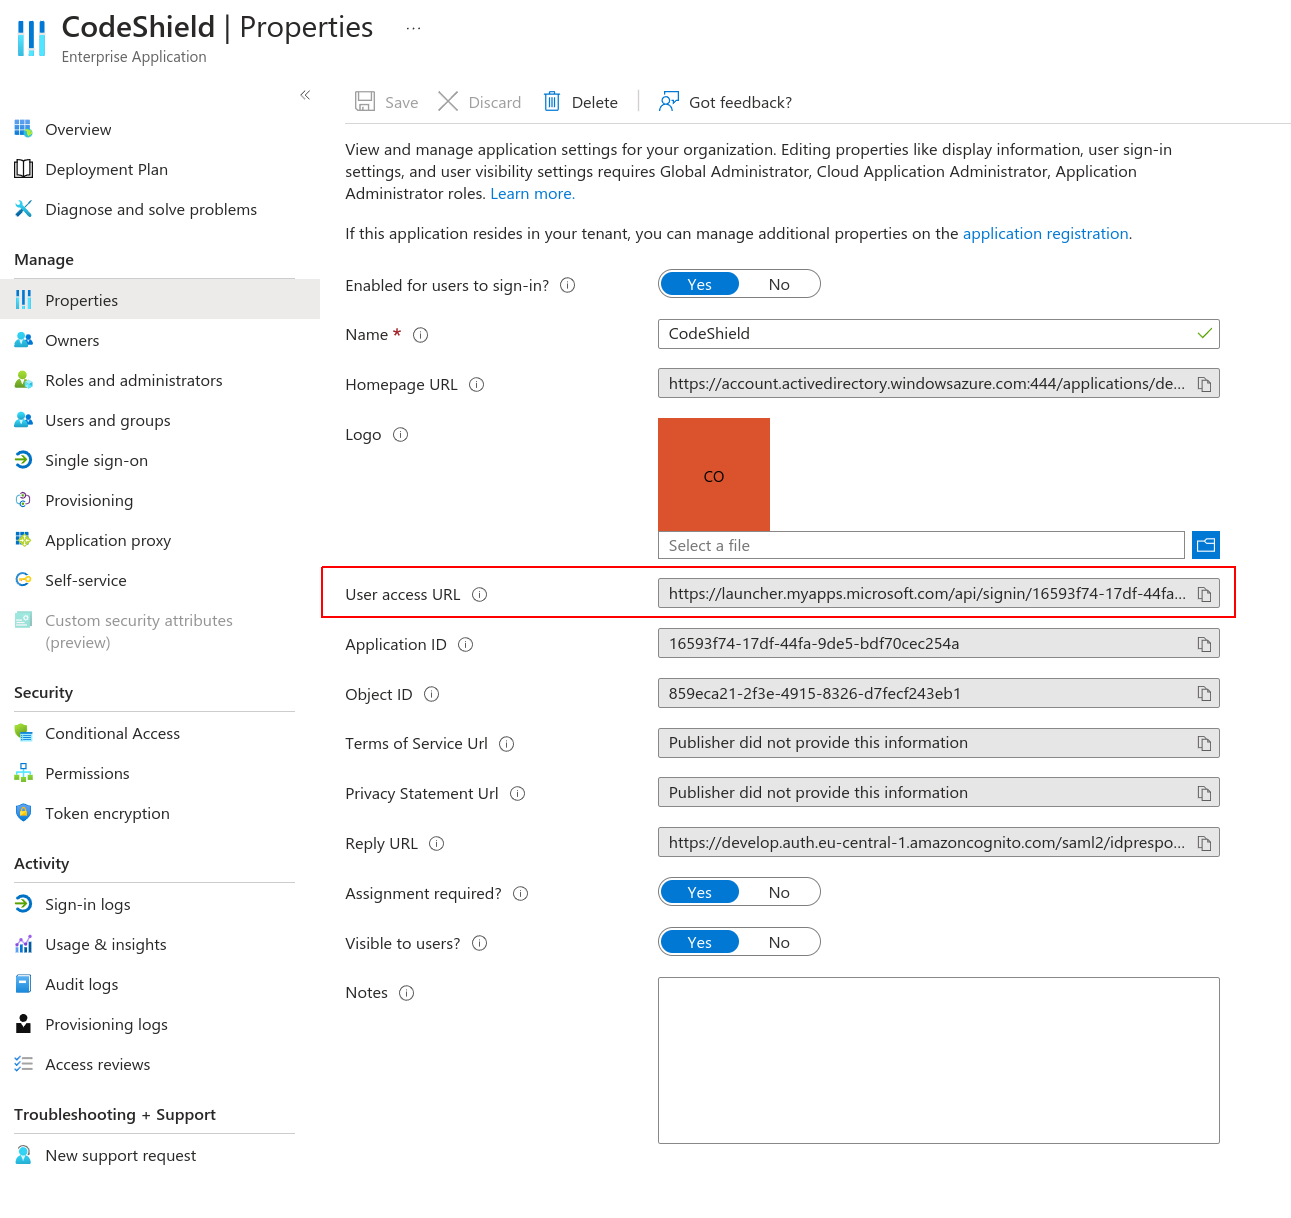
- You can either provision all assigned users ahead of time, or you wait for each user to sign in once. CodeShield can handle both approaches. Each user stemming from the Azure AD and the admin user (user that created the SSO connection) are free to share connections and scans with each other. See Access Management.